 |
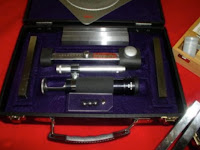
| Portable Hardness Testing Kit |
Various methods and procedures are used to measure hardness. One method is to create a "dent" on a target material (under controlled conditions) and then carefully measure the resulting indentation. The indentation correlates directly to the hardness of the material. In very general terms, the smaller the mark, the harder the material, and the larger the indentation, the softer the material.
The Brinell Hardness Number (BHN) and Brinell testers are very popular. Brinell testing is done by pressing a perfectly spherical ball (10 mm in size) into a target material with a force of over 6600 lbs (3000kg to be exact) for a minimum of 10 seconds, and then measuring the resulting impression. After which, the size of the impression is measured by an optically scaled microscope positioned over the impression.
Laboratory Brinell testers are obviously impractical in the field, but portable, lightweight Brinell testers are available for weld hardness testing in the field. These portable testers are easily transported and simple to use. No special training is required and in a few minutes anyone can learn to determine a Brinell Hardness Number accurately.
The accuracy of portable Brinell testers are done via NIST traceable test bars. The test bars are calibrated to a uniform hardness of ±3% of their labeled Brinell Hardness Number. Additionally, the microscopes used for measurement are capable of reading within .05 millimeters.
Typical Field Procedure
A test bar with a known BHN, and approximately the hardness of the target material to be tested, is chosen. The test bar is inserted into the Brinell test instrument and the instrument placed upon the specimen. A steel impression ball, secured in the the head of the instrument, is in contact with both the test bar and the target material. Built-in to the test instrument is an anvil, which is then struck sharply with a hammer. Via the impression ball, the impact of the hammer, regardless of force, is transmitted equally to the test bar and to the target material, leaving marks in both. The diameters of the resulting indentations are directly related to the respective hardnesses of the test bar and the specimen. The bar is removed from the test instrument and the microscope is positioned over the appropriate indentation. The impression in the specimen metal is measured in the same manner and the hardness is determined.
For more information on portable Brinell Harness Test kits, contact:
Hotfoil-EHS, Inc.
2960 East State Street Ext.
Hamilton, NJ 08619
Phone # 609.588.0900
Fax # 609.588.8333
www.hotfoilehs.com


